Remote Viewing by IE
Note: Before Remote Viewing, you must configure Internet Security Settings and display settings,
"Colors" adopts True Color(32 bit) , and "Screen area" adopts 1024 by 768 pixels.
The steps are as follows:
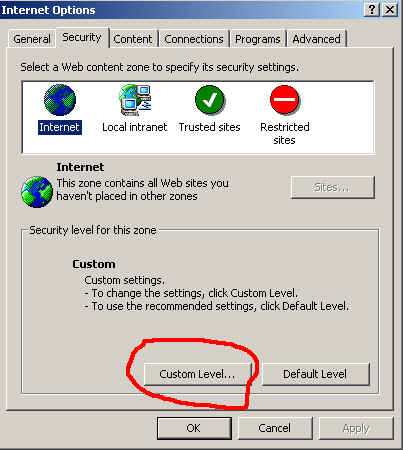
1) Launch Internet Explorer, then choose Tools: Internet Options from the menu bar at the top.
Click the Security Tab in the Internet Options screen, pictured below:
2) Click the Custom Level... button, which will take you to the Security Settings dialog box. Enable Download unsigned
ActiveX controls.
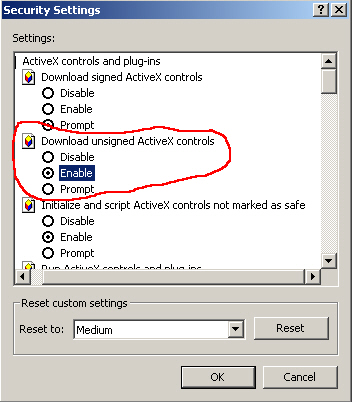
3) Click the Ok button of the Security Settings to finish the security settings.
Now you can begin remote viewing by IE as follows:
1) Launch Internet Explorer. In the Internet Explorer address bar, type the PUBLIC IP ADDRESS* of the DVR that you're trying to connect to, followed by a colon, and the number 9009 ( example: http://75.13.122.238:9009 ).
*Public IP address of the DVR Server can be obtained by going to http://www.whatsmyip.org on the DVR Server.
*Please note :To access the DVR from within your Local Area Network, launch Internet Explorer and type the PRIVATE IP ADDRESS of the DVR you're trying to connect to. This address can be obtained by going to the Start button (on the DVR), and selecting "Run." Type "CMD." Click the "OK" button. Type "ipconfig" then the "Enter" button on your keyboard. You should see several numbers, one of which will be called "IP Address." This is the number that you'll need to enter after launching Internet Explorer on a computer connected to the same network as the DVR. There is no need to type the colon followed by 9009. You'll be prompted for a username and password before you're allowed access.
2): A dialog box will appear. Internet Explorer version 6 will fill in the IP address automatically in the dialog box. Internet Exploer version 7, unfortunately, requires that you RE-TYPE the IP address of the DVR Server. The colon plus 9009 are not necessary. Just type in the IP address. Then enter your user name and password.
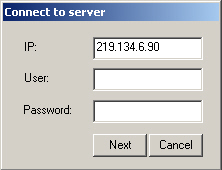
Note: the [user] and [password] are in accordance with those of DVR's administrator.
3) click Next to connect DVR server
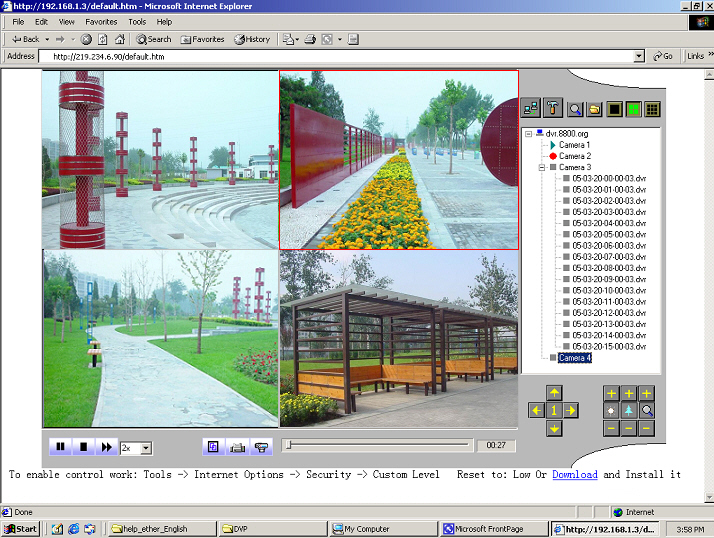
4) Now, you should be able to view the video streams for the DVR Server
Please note that the maximum number of viewable screens is 16. For 24 and 32 Channel DVR servers, this means that only cameras 1-16 will be displayed. To view an additional camera, one of the current cameras must be stopped, and replaced with a new one. For example, if cameras 1-16 are displayed, and you need to be able to view camera number 17, you'd have to select one of the currently displayed cameras, stop it's playback, then select camera 17. Instuctions are as follows:
a) The right of the IE client interface displays all the cameras of the DVR Server.
b) Click the screen representing the camera you'd like to "swap" for a new camera not currently displayed. A red square will enclose the screen
c) Right click, and select "Stop" in the drop down menu.
d) Select the camera that you'd like to view from the list of cameras in the column on the right.
e) The new camera's video should start to display in the screen after a few seconds
Remote File Playback (remotely play back files that have been recorded to the DVR's hard drive)
a) First, click the "square" representing the camera you'd like to "swap" for playback of a remote file. A red square will enclose the "square." Right-click on the "square" and select "Stop."
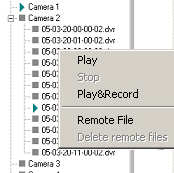
a) Right click the desired camera's number in the column on the right (this can be ANY of the cameras on the left----doesn't have to be the one you originally started out with in the "square."). You should get the following menu:

b) Choose "Remote File" and a calendar pop up will display, allowing you to choose a date for playback. Once the date is selected, you'll see a selection of 23 files, representing each hour of the day, underneath the camera you chose in the column on the right. Click the "hour" you'd like to view, and the video will stream to the "square" you selected previously. Please note that before any changes can be made to the video feed again, the current footage playing must be stopped; Again, this is done by right clicking on the desired "square," and selecting "Stop." At this point, another hour from the same day can be selected, and the video will begin to stream. Alternatively, after stopping, if you'd like to view live footage again, instead of playing a previously recorded remote file, simply select the Camera you'd like to stream to the selected "square," and, after a few seconds, the selected camera's live footage will be displayed in the selected "square."
Any of the "squares" on the screen can be enlarged by double-clicking on them. To return to normal size, double-click the enlarged "square."
Please note that when a remote file is being played back, there is a slider at the bottom of the screen. This is only displayed to give the viewer the relative location of where the playback head is in real time. The slider does not allow for fast forwarding or rewinding remotely. In addition, while viewing remote files, the drop down menu will display a "forward" option. This is inactive. Bandwith limitations prevent this functionality. Remote files can only be viewed starting from the top of each of the 24 hours in the day.